I cooked every MEAT with a CAST IRON Skillet, WOW!
For today's cook I'm gonna show how Itook my cast-iron skillet to a complete new level.
You're gonna be seeing someincredible meats that you would normally not cook on one of them, and some turnout just awesome others not so much.
And the main goal for this video is to seeif the cast iron skillet can cook every single meat.
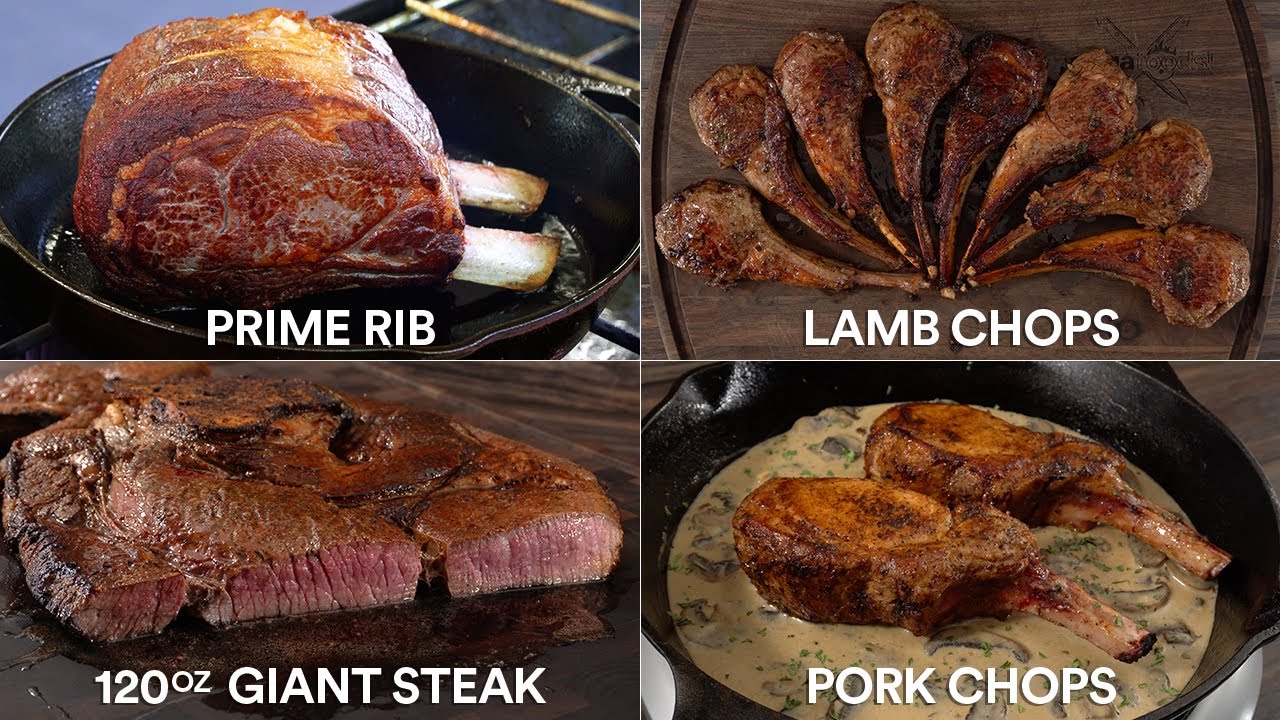
So let's do it! We're gonna start off with theFlintstone steak.
As the name says it it is the biggest steak you can actuallyfind, and this is the reason why.
As you can see it is a monster steak, it is alsonot very popular and very difficult to find, but when you have a great meatdealer he can always hook you up.
And as you can see this one even has some bonemarrow which is definitely a plus.
It is also about 1 inches thick and regards tosize we're talking about 10 inches by 15 inches.
And I know you're gonna ask mefor the weight it is a seven and a half pound steak.
Now take a look at myskillet there's absolutely no way that this thing is gonna fit in here, but we'redefinitely gonna make it happen.
From previous experiments with thissteak I know that if you don't cut out the fat on the edges it will curl up onyou.
So if you happen to get one of these make sure you remove the fat all the wayaround.
And just in case you are wondering the steak is still the sameexact size I just took out the fat around.
For the seasoning and I kept itquite simple a little bit of salt, freshly ground black pepper and garlicpowder.
Since this is a huge steak make sure you season both sides.
As you cansee by the time I was done its perfectly seasoned.
To cook it in order to ensure Ihave enough heat I'm using my powerful gas stove.
So I started by adding alittle bit of grapeseed oil into the cast-iron skillet.
Once it was up totemperature I add in my steak and that was extremely challenging.
You got tomove it around from edge to edge make sure you fit that steak as best as youcan and it is very challenging.
You just gotta wiggle it push it tuck itand some way somehow I was able to fit it in, but that is what I would like tocall a very tight squeeze.
After cooking it for about two minutes it was now timeto flip and once I did oh it is another tight squeeze but as you can see thecast-iron skillet is working like a charm.
My goal is to reach an internaltemperature of 135 degrees Fahrenheit with this steak and for that I recommendflipping it as much as possible, but that is easier said than done.
But afterflipping it around several times I was finally able to reach the internaltemperature.
And this is what I was left with.
Here we have the Flintstone steakcooked on a cast iron.
In Brazil we call the steak capitão and that's becauseit's the captain of all steaks.
You will not find any bigger stake than this.
Ican't wait any longer and it's time to cut it open, and once I did moveperfectly medium-rare just the way I like it.
It will be a crime to cook it well-done.
And as you can see the cast iron skilletdid its job perfectly and as I went in for the bite I'll tell you one thing it, is not the most tender steak I've ever had.
It does have a wonderful flavor andif you ever want to cook a monster steak like this make sure you cut it real thin.
Because I'll tell you one thing this is not a tasting steak, it is one that youcan feed the whole family and it should definitely be on your bucket list atleast once.
Moving on to the very next cook we're talking about pork chops.
Deliciousbeautiful pork chops that it's perfectly cooked with your cast iron skillet.
Thisone is gonna be good.
And of course we start off with the beautiful pork chops.
As you can see these are bone-in and most importantly they have wonderfulmarbling throughout the meat.
As you already know this is a sign that it'sgonna be nice and tasty.
The first thing I like to do is to transfer it to asteak plate so that my seasoning will not fly all over the place.
Talking aboutseasoning I started with salt, followed by freshly ground black pepper, garlicpowder and obviously Guga's rub.
You can use any type of seasoning you like justmake sure you season both sides.
To cook it you want to keep it under medium heat.
As you can see they are about an inch and a half thick and if you keep thetemperature too high they'll just burn on you.
Flip them as many times asnecessary.
The old saying of only flip ones is not really true and by flippingthem multiple times you will ensure that they've cooked evenly.
And of course donot forget to sear the fat and the edges because if there's one thing that yougotta cook to perfection is actually the fat.
If you have great long tongues likeI do right here make sure you use them.
As you can see they are perfect to holdyour pork chops exactly the way it needs to be.
As they are cooking you arelooking for an internal temperature of 145 degrees Fahrenheit that will giveyou perfect doneness for the pork chops.
Once that internal temperature wasreached you can see there they're cooked to perfection.
Now you want to let themrest for at least three minutes which is the perfect timing for us to make asauce.
So using the same cast-iron skillet I threw in a bunch of whitemushrooms.
You want to cook them until you get a nice golden brown color justlike this.
To help reduce the moisture and also season them I threw in a littlebit of salt, mix them well and make sure you remove that moisture.
To deglaze thepan and add more flavor I'm using 1/2 a cup of Marsala wine.
Make sure to mix itwell and remove all that goodness from the bottom.
Then throw in 1 cup ofchicken stock and mix it well.
To finish it up I added about a teaspoon of garlicpaste, followed by a teaspoon of freshly ground black pepper and half a cup ofheavy cream.
Now all there's left to do is to melt two tablespoon of butter, mix itwell in your sauces done.
That friends is exactly what you're looking for.
For anice beautiful finishing presentation add in your pork chops, followed by alittle bit of freeze dry parsley and you are left with a beautiful pork chop thatanyone will love.
That is perfect for any occasion whether you're going on a datenight or just serving yourself.
This one will never disappoint.
And as you can seeit was cooked to perfection and just in case you are wondering yes a little bitof pink on your pork is absolutely okay.
And I'll tell you one thing this wasabsolutely delicious and using that mushroom cream sauce to go along with itjust takes everything to a whole new level.
Now let's move into the master ofall holiday roasts.
Because I'm talking about prime rib, and as you can see thisone is gonna be phenomenal.
And of course we start off with a beautiful standingrib roast.
As you can see this one has two bones and it will feed anywherebetween three to four people.
To make sure that my seasoning will stick I liketo also trim the edges.
As you may know salt cannot penetrate fat, so to makesure that we got seasoning throughout the whole meat the external fat has togo.
The very next thing I like to do is to french the bone.
This is completelyunnecessary and it's for presentation purposes only.
The easiest way to do itis to use a meat hook you, can also use a very old knife.
Definitely don't use yourfancy knives for this.
Because as you can see by the time I was done I was leftwith beautiful bones, and as I mentioned it is for presentation purposes only.
Toensure that it maintains its shape throughout the cooking process I like totranscend it with butcher's twine.
Now to me this is one of the most importantstep.
This is a thick piece of meat and if you just season it with salt rightnow and put it directly into the oven to cook I can almost guarantee you thatthat prime rib will not be perfect.
And that's because the salt will not haveenough time to penetrate nicely and deeply into the meat, so for that I liketo use what's called dry brine.
It is just a fancy word which means seasoningwith salt and leave it overnight on your refrigerator.
The bigger the meat thelonger you should leave it, just keep in mind to never exceed 48 hours.
But after24 hours I took it out of the refrigerator and check that out.
The saltis completely gone, but as you can see the fat did not absorbed it, and that is one of the reasons I like to trim it all outfirst.
The next thing we gotta do is quite important which will develop additional flavor, and that is to make a seasoned butter.
I started with oneteaspoon of black pepper, followed by another one of chili flakes, two teaspoonof garlic powder, 2 tsp of Guga's rub, 2 teaspoon of onion powder, 6 tablespoonsof room-temperature butter and mix it well.
Make sure you combine all of thoseingredients together, because once you're done you should be left with a beautifulseasoned butter just like this.
But now going back to our prime rib it's time tocook it.
So I set my cast iron to medium-high heat and make sure to get anice sear in all sides including the edges.
Once I completed the searingthroughout the whole thing you can see I was left with a beautiful prime rib.
Pretty much every single piece is perfectly crusted.
And that is exactlywhat you're looking for.
While it's still hot I like to put it in a cooling rackso that I can start applying my butter.
And make sure you get every single edgebecause that is what will give your prime rib additional flavor.
And do notbe shy my friends.
I know you heard the saying butter makes everything betterand believe me when I tell you for a prime rib that is absolutely true.
Toensure that I'm cooking it to the perfect doneness I am gonna be using mywireless thermometer.
Talking about that I'm aiming for an internal temperatureof a hundred and thirty five degrees Fahrenheit.
Now all there's left to do is toset my oven to 250 degrees Fahrenheit and throw my prime rib in there.
Let itcook until your desire internal temperature is reached.
And once my was Itook it out of the oven, set it into my cutting board and that is a perfectlycooked prime rib.
I mean there's not much to say it is the perfect roast for theholidays or any occasion as a matter of fact.
That my friends is as good as itgets.
To carve it the first thing you want to do is remove the butcher's twine.
Then I recommend slicing the bones out, this will make the job nice and easy.
Get yourself a nice big slicer and go to town.
And as I took my first slice eventhough it was rested you can see it this thing is extremely juicy.
I would sayit's the Niagra Falls of beef and it is basically meat heaven.
I'll tell you onething as I go in for my first bite take a look at this absolutely perfection.
Itis one of those things that you cook and it brings memories.
And for thick cuts like this definitely use the dry brine technique.
And wheneveryou're ready to cook your next holiday roast using your cast-iron skillet willdefinitely do the job, because this one was truly delicious.
Now the next one istruly special and I think the cast iron was made a hundred percent to make this, and we're talking about lamb chops.
And the first thing I like to do is to makea marinade, which is super easy to do.
So into the pestle and mortar I threw in alittle bit of black pepper, crushed it well into was completely pulverized.
ThenI throw in some garlic, followed by parsley, thyme and salt.
Crushed it well and make sure everything combined into a paste just like this.
Forthe wet ingredients I started with my favorite hot sauce, followed byWorcestershire sauce, and a good amount of olive oil.
Mix itwell in your marinade is done.
That friends isn't as good as it gets, it isalso quite strong, so just as much is plenty for a whole rack of lamb.
Talkingabout that this is the star of this cook.
As you can see mine came alreadyfrenched.
Usually they come just like this, ready for you to go.
Here in theU.
S.
there are two kinds you can buy either imported or domestic, and theseare domestic.
For the cast-iron skillet the best preparation is to take themapart.
Just flip them on the fat cap and start chomping them between the bones, itis not a big deal.
As you can see by the time I was done I was left withbeautiful lamb chops.
Now there's left to do is to apply ourmarinade.
The most important thing is to make sure every single one of them iscoated.
You can either do this by applying them individually one by one orthrow them in the vacuum bag to make sure every single one is coated.
Now thecool thing about it is that if you have a vacuum sealer or a vacuum chamberyou'll make this process real quick.
Once it's completely vacuum sealed you wantto leave in marinade on your refrigerator for at least two hours.
Butif you don't use a vacuum sealer you can leave them overnight.
Once the marination time was done all there's left to do is to remove them andget them ready for the cast iron.
And as you can see every single piece has alittle bit of that marinade.
Set your cast iron to medium-high heat and addthe lamb chops.
Let it sear for about one minute and then it's time to flip.
Keepin mind that they cook real quick and the last thing you want to do is toovercook lamb chops.
You're shooting for an internal temperature of a hundred andthirty-five degrees Fahrenheit.
And once that temperature was reached this iswhat I was left with.
Perfectly cooked lamb chops and thatcast-iron sear is exactly what you're looking for.
I think this might be thebest way to cook lamb, it not only puts a beautiful crust on them but cooks themto perfection.
That is how you want your lamb to be pink in the middle is alwaysthe way to go.
Because you don't need any fork for this it is best to use yourhands.
And we all know what Gordon Ramsey is thinking where's the lamb sauce.
Usingthe same exact pan I throw in two cups of chicken stock.
You want to cook it andlet it reduce to half, once that's done throw in half a cup of heavy cream, mixit well and make sure you combine all of the ingredients together.
Get twotablespoon of cold butter and incorporate that into the sauce.
Oncethat's done you are left with a perfect lamb sauce that is easy to make but mostimportantly make Gordon Ramsay happy, because as you already know if you don'tgive him the lamb sauce no good.
In trying it with the lamb sauce okay yesGordon Ramsay the lamb sauce does make it better.
But I'm telling you rightnow if you don't want to make the sauce it's good enough, but if you have thetime make it because you will not regret it, Now jumping on to the next one we'regonna make an amazing and incredible chicken breast and this one is gonna bereal good.
And of course we start off with four of them.
These are organicchicken breasts and if you have a choice to buy organic definitely do, it justtastes better.
To season them I throw in salt followed by freshly ground blackpepper, garlic powder and onion powder.
Just like every single meat make sureyou season all sides including the edges.
To ensure that we cook them evenly Ilike to use a meat mallet.
And to make sure we don't splatter anything all overthe place it is always best to start with some clean plastic.
Using the meatmallet hammer them down as much as possible.
You want them nice and flat tomake sure every single one of them has the same thickness.
And I definitely recommend starting the seasoning before this process thisallows you to press the seasoning down into the meat.
Now to help achieve thatgolden brown crust that we are always looking for in chicken breasts I like touse a little bit of all-purpose flour.
Keep in mind that we're not making friedchicken here we just want a nice dry surface but at the same time adding anice crust on the chicken.
So talking about that now that I have it ready itit's time to cook.
I set my cast-iron skillet tomedium-high heat, throw in my oil and started to sear it.
One important thing toremember is to have enough oil onto the pan becauseof the flour I recommend not touching this one for at least one minute, becauseonce that minute is up I do my first turn and check that out.
Nice golden-brown crust exactly what we're looking for.
I like to cook mychicken breasts until I reach an internal temperature of 160 because as Irest it will climb up to 165 which is exactly what the FDA recommends.
And asyou can see I was left with perfectly cooked chicken.
Now using the samecast-iron skillet I three white mushrooms, kept them moving until Ideglazed the entire pan.
To help extract even more moisturize doing a little bitof salt, mix it well and cook those mushroom til they were fully cooked, andyou can tell when they look just like this.
Then I threw in a little bit ofonions, followed by garlic paste and mixed it well.
Once everything has beencombined throw in a little bit of chicken stock, followed by heavy cream, mix everything well and combine both of those ingredients together.
To finish itoff all there's left to do is to emulsify in a little bit of cold butter, add in your chicken, throw in some parsley for coloring and flavor and theabsolute best way to have chicken breast is done.
This my friends is as good as itgets.
Making chicken breasts like this is notonly easy but it's also something you can look forward to.
And I'll tell youone thing, once you make it once, I'm pretty sure you're gonna make it severaltimes over because if there's one thing cast iron is always good for us to cookbeautiful chicken just like this.
And let me not even begin to tell you how goodthat sauce is.
Combining these both things together is absolutely phenomenaland I definitely recommend you giving this one a go.
Now let's talk about thebutchers secret steak because it's also known as hanger steak.
And if you enjoybig flavors this one is the steak for you.
And as you can see the marbling ofthis one is absolutely out of this world.
That is exactly what you're looking forwhenever you purchasing any kind of steaks.
To cook this one it's prettystraightforward.
We're gonna keep it as basic as possibleso I season it with salt, freshly ground black pepper and garlic powder.
As youalready know it is important to season both sides including the edges.
Now thismight be one of the best methods to cook steak on a cast-iron skillet and that isto do the butter basting method.
And for this one I'm gonna be using thyme, butterand garli.
So I started up my gas stove and set it to high heat.
Threw in alittle bit of grapeseed oil and started the sear.
This steak is nice andthin so you really want high heat.
And another thing I recommend is to keep itmoving that way we ensure that you cook the steak evenly.
Just like previouslyyou want to keep flipping the steak as much as possible.
The last thing you wantto do is to overcook a hanger steak because it will not be good.
Once you'vereached the sear that you're happy with it's time to lower the heat.
Throw in thegarlic, butter and thyme.
And here's a great tip if you did not throw enoughbutter on the pan to baste it with a spoon the easiest and the best way to dois just to move the steak around.
That way we're sure that every single edge ofthat steak is perfectly basted because all you're really trying to do is toinfuse that butter flavor onto the steak.
And at the same time keeping the eye onthe temperature because you are shooting for an internal temperature of 135degrees Fahrenheit, and once that's reached your hanger steak is ready.
The cast-ironskillet definitely did its job.
And as I took my slice ooh that is juicy.
Eatingit just like this nice juicy and tender is definitely the way to go because thisis a very flavorful steak and over cooking something like this will totallybe a crime.
And if you've never tried a hanger steak definitely give it a go itmight become one of your favorite steaks to eat.
Moving on to the next one I knowwhat you're thinking; Guga you're cooking chicken again? No, no my friends this isnot chicken I know it looks like one but I can guarantee it's not because we'retalking about this one right here.
And I'm gonna ask you to go down on thecomments section and let me know what this is, because if you do I'll tell youright now you are good.
You gotta have an open mind for this one because this isone of those meats that we say don't knock it until you try it.
And if you'venever had it it's real good and it's super easy to make.
And as I open thewhole thing up hopefully by now you know exactly what it is.
We're talking about arabbit.
Now you can cook it whole and I've done that before.
And if you have notseen that video make sure you check it out on the card above.
Before thecast-iron skillet we're gonna take it apart, and it's pretty easy to do.
Istarted by removing the thighs and there should be no force just go nice and slowand make sure you cut between the bones.
Once both legs were removed I jumpedinto the arms, and that is the same exact process.
Just let your knife do the work and go nice and slow.
Once both were taken outflip it on its back and start working on the tenderloins.
It is pretty easy to doyou just gotta run your knife through the backbone.
It is similarto filleting a fish nice and slow and precise cuts with the knife will makethe job easy.
Because as you already know a rabbit it's not that large.
Butonce I was done with all of the butchering this is what I was left with.
We got the thighs the arms and everyone's favored the tenderloin.
Butnow that our butchering is completely done all there's left to do is to apply ourmarinade.
And this marinade is fantastic and here's how to make it.
Into the foodprocessor I threw in some garlic and chopped it all up.
And here's one of myfavorite things to use that I get asked all the time.
These are red onionshowever there are freeze-dried onions, and I'll tell you one thing if you'venever had freeze dried onions man you should because they are absolutelyphenomenal.
The same goes for parsley and this one is also freeze dried.
So afterthrowing both of them in I added a little bit of chili flakes and when Isay a little I mean a lot because we want our rabbit to have a nice flavor.
Then to finish it off the marinade I added olive oil, turn on the foodprocessor and let it run.
To finish it all up and a little bit of lemon juice, followed by salt, turn on your food processor, mix everything well and yourmarinate is done.
Even if you don't use this marinade for a rabbit at least useit for chicken, because this one is a winner.
And just like the lamb chop ifyou want the marinade to penetrate deeply into the meat I definitelyrecommend vacuum sealing it.
This cuts the marination time to half, and alwaysremember to let it marinate in your refrigerator.
Talking about that I let itmarinate for a total of 12 hours.
The very next day I took it out of the bagand as you can see it is ready to be cooked.
Cooking a rabbit in a cast-ironskillet is very similar to chicken.
Keep it under medium-high heatand flip it every minute or so.
You're looking for that nice beautifulcaramelization on top.
I recommend to keep flipping it until you reach aninternal temperature of 160 degrees Fahrenheit that will give you aperfectly cooked rabbit.
And as you can see by the timeline was done it justlooked perfect and if you've never had rabbit you should.
I mean check this outas I take my first slice.
It is very similar to chicken but it's not chicken.
And I'll tell you one thing if you never had it definitely give it a try becausesome of my family members like rabbits way more than chicken.
I just don't tellthem what it is, because as far as they know they justthink it's chicken.
So we'll keep that between you and me.
That is all the meatI currently have in my house.
I cook everything everybody.
Anyway guys I hopeyou enjoyed this video.
If you do enjoy it make sure to give it a thumbs up.
Ifyou're not a subscriber be sure to subscribe for future videos.
Remember ifyou are interested in anything I use everything is always on the descriptiondown below.
Thank you so much for watching and we'll see you guys on thenext one.
Stay safe, keep cooking if you keep cooking I will.
See you guys in thenext one.
Take care everybody.
Bye bye.
.